Cleaning up Multiple Contacts
When entering contacts into FilePro the best practice is to always check if the individual or company is already a contact in the system. If they are, there is no need to enter them again.
There can be instances where you may have multiple contact cards for the one contact in the system due to historical data and you feel it is time your contact listing was tidied up.
Outlined below are the steps you will need to take to do this.
Step 1
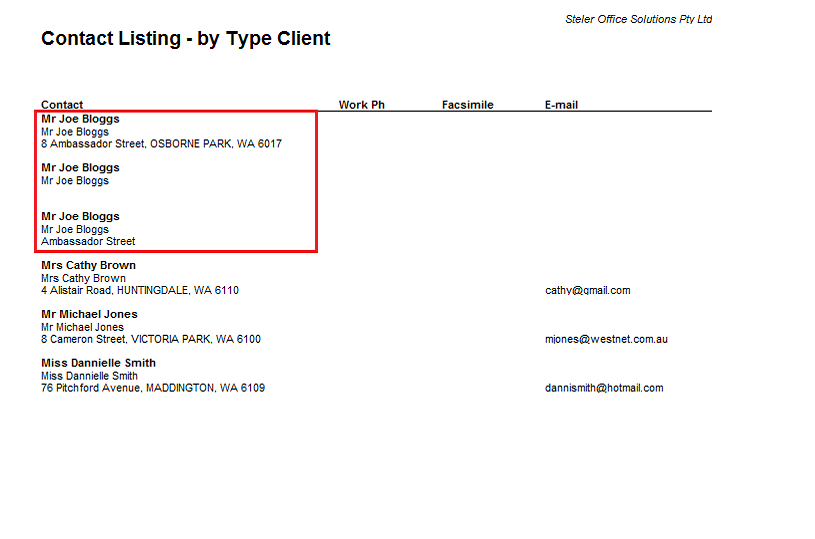
Run your Contact Listing Report.
Once you run this report you will be able to highlight any Contacts that are appearing more than once.
In some instances you will find that one of the contacts has more stored information, it would then be beneficial to keep this as your main contact and delete the others.
In the example above I would want to keep the first Contact record for Joe Bloggs and delete the other two.
Step 2
Once you have decided which contact you want to keep you will first need to check if the additional contacts have any associations.
To do this, you need to open the contact you wish to delete and click on the Associations Tab.
You then need to click on each tab within Associations to check if this contact:
-
-
-
Is a Contact in any of the following tabs on a File; Contact, Family Law, Probate and Court
In the example above, you can see that this particular contact is associated with an Active file.
You will still be able to delete the contact, but first you need to change the contact in the file to the contact you wish to keep.
A contact that is associated in any way to a file cannot be deleted. If you tried to delete it, the following message would appear.
Step Three will need to be followed before you can delete.
Step 3 - Change the contact details in the Associated Active file
Open up the Associated File, in the example above it is File 20120007.
Go to the Details tab and navigate to Contact on the left hand side. You will need to use the drop down arrow to open the lookup screen.
Once you have selected the drop down arrow, the look up screen will appear and you can select the contact you wish to keep to be associated with this file.
In this instance I would like to keep Contact number 5 so I am selecting that contact to be associated with this file.
Once this change has been made I can now go back into Contact 6 and you will see that there are no longer associations with it.
This means that I can continue with deleting, by clicking the – button on the top row of the contact screen.
If the contact is associated with an Archived file you will be able to follow these same steps and link up the file with the correct (tidy) contact.
If the contact is associated as a Contact on a file, either on the Contact, Family Law, Probate or Court tab, the same principle applies. Just link to the correct Contact.
In the Contact tab you can edit any of the added contacts by clicking on the triangle at the bottom of the file screen.
This then opens up an Edit Contact box and again you are able to link to the correct contact, the one you wish to keep.
You will follow all of these steps for all contacts you wish to delete, being sure to leave one contact card to associate with the files.